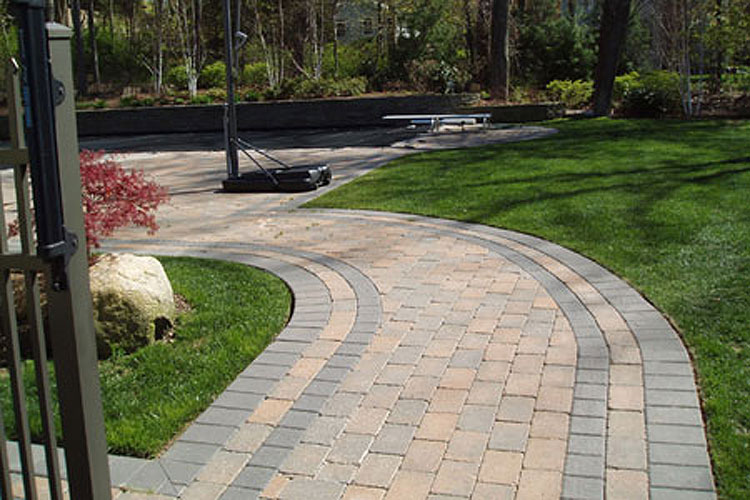
A lot of homeowners are often asking how to build paver steps to patio.
When you do have a patio on the backyard,
paver steps
you have to add some paver steps to enhance its look as well as give you easy access to the patio.
For those who have never tried making paver steps for the patio, or uneven ground
there are some easy instructions and tips to follow.
paver steps
1. Preparation and Clearing – How to Build Paver Steps to Patio
The first thing that you have to do is preparing the area,
and then clearing it up.
paver steps
Make sure that the area where the paver steps are going to be placed is even.
They have to be cleaned up from excess soil and grass as well.
paver steps
Read More :
- 6 Easiest Steps & Guide on : Hot to Make a Brick Patio on Uneven Ground
- 95 Best Small Apartment Patio Ideas You’ll Love in 2021
- How to Make a Brick Patio on Uneven Ground

paver steps
2. Paver Base and Sand
The next step on how to build paver steps to patio is to add the paver base and sand.
The base can be made out of numerous types of materials.
paver steps
However,
gravel is the most common one to choose from.
Gravel is considered sturdy and durable.
paver steps
After the gravel is layered evenly, sand is poured on top of it.
Press and make the base as dense as possible (How to Build Paver Steps to Patio).
paver steps
Read More : 3 Best Natural Stone Patio to Use as Outdoor Design Inspiration

paver steps
3. Adding Stones and Finishing – How to Build Paver Steps to Patio
After the base is ready, you need to start placing the paver stones.
Then, cut the pavers according to the size and requirement of the steps
“how to build paver steps to patio”
paver steps
When that step is done, you can start adding the edging stones and the patio paver will be finished.
paver steps
Read More:
- 13 Best Fits Flagstone Patio Pictures for Tiny Little House and Medium Landscape
- 22 Best Popular Apartment Patio Ideas and Themes
- Best Choice About Alumawood Patio Cover and Things to Consider
paver steps
By following the instructions shown up there,
you can certainly make the DIY project easier.

paver steps
If you are not sure, though, you can always use the help
of handyman or professional constructor.
paver steps
However,
the project is generally doable and a lot of people
have done the project on their own.
paver steps
All they need to do is following those instructions on
how to build paver steps to patio above.
More how to build paver steps to patio for All Country Including the USA, Europe, Australia, Asia, Middle East – Best Home Furniture.
Alabama, Alaska, Arizona, Arkansas, California Colorado Connecticut Delaware District of Columbia Florida Georgia Hawaii Idaho Illinois Indiana Iowa Kansas Kentucky Louisiana Maine Maryland Massachusetts Michigan Minnesota Mississippi Missouri Montana Nebraska Nevada New Hampshire New Jersey New Mexico New York North Carolina North Dakota Ohio Oklahoma Oregon Pennsylvania Rhode Island South Carolina South Dakota Tennessee Texas Utah Vermont Virginia Washington West Virginia Wisconsin Wyoming
British, Italia, Rusia, South Africa, Dubai, Saudi Arabia, Australia, Sydney, New Zealand, Indonesia, Philippines, Malaysia, Singapore, Tokyo, Japan, Taiwan, South Korea.
Arab Saudi – Riyadh Armenia – Yerevan Azerbaijan – Baku Bahrain – Manama Georgia – Tbilisi Iran – Tehran Irak – Baghdad Kuwait – Kuwait City Lebanon – Beirut Oman – Muscat Palestina – Ramallah Qatar – Doha Siprus – Nicosia Suriah – Damaskus Turki – Ankara Uni Emirat Arab – Abu Dhabi Yaman – Sanaa Yordania – Amman – China – Beijing Hong Kong – Hong Kong Jepang – Tokyo Taiwan – Taipei Makau – Makau Mongolia – Ulan Bator Korea Selatan – Seoul Korea Utara – Pyongyang – Afghanistan – Kabul Bangladesh – Dhaka Bhutan – Thimphu India – New Delhi Maladewa – Male Nepal – Kathmandu Pakistan – Islamabad Sri Lanka – Kolombo – Brunei Darussalam – Bandar Seri Begawan Kamboja – Phnom Penh Indonesia – Jakarta Laos – Vientiane Malaysia – Kuala Lumpur Myanmar – Naypyidaw Filipina – Manila Singapura – Singapura Thailand – Bangkok Timor Leste – Dili Vietnam – Hanoi – Algeria – Algiers Libya – Tripoli Mesir – Kairo Maroko – Rabat Sudan – Khartoum Sudan Selatan – Juba Tunisia – Tunis – Guatemala – Guatemala City El Salvador – San Salvador Honduras – Belize Nikaragua – Managua Kosta Rika – San Jose Panama – Panama City – Argentina – Buenos Aires Brasil – Brasilia Bolivia – Lapaz Chili – Santiago Colombia – Bogota Ecuador – Quito Guyana Perancis- Cayenne Guyana – Georgetown Paraguay – Asuncion Peru – Lima Suriname – Paramaribo Uruguay – Montevideo Venezuela – Caracas – Denmark – Kopenhagen Islandia – Reykjavik Norwegia – Oslo Finlandia – Helsinki Swedia – Stockholm – Yunani – Athena Italia – Roma Spanyol – Madrid Portugal – Lisabon Malta – Valletta Vatikan – Vatikan San Marino – San Marino Andorra – Andorra la Vella – Austria – Wina Belgia – Brussels Belanda – Amsterdam Inggris – London Irlandia – Dublin Monako – Monako Perancis – Paris Luxemburg – Luxemburg Liechtenstein – Vaduz Jerman – Berlin Swiss – Bern
Free Picture, Free Photos, Free Download, Image Ideas & Free To Share – Public Domain – Royalty Free


