How To Make a Brick patio on uneven ground ideas – Many construction jobs will go easier if only all the grounds are on an even level. Sad to say, sometimes you have to bump into the problem. Of installing your patio base on uneven areas because the earth is not flat.
Pros – Make a Brick patio on uneven ground
- Aesthetically pleasing: A brick patio can enhance the visual appeal of your outdoor space and create a charming and inviting atmosphere.
- Durable: Bricks are known for their durability and can withstand various weather conditions, making them suitable for outdoor use.
- Versatile: Bricks come in different sizes, shapes, and colors, providing you with a wide range of design options to create a unique patio.
- Easy maintenance: Brick patios are relatively low-maintenance. They are resistant to stains and can be easily cleaned with water and a mild detergent.
- Long-lasting: When properly installed and maintained, a brick patio can last for decades, offering long-term value for your investment.
- Environmentally friendly: Bricks are typically made from natural materials such as clay or shale, making them an eco-friendly choice for outdoor construction.
Cons – Make a Brick patio on uneven ground
- Uneven surface challenges: Working with uneven ground can be more challenging and time-consuming. It may require additional preparation and leveling before laying the bricks.
- Increased labor and cost: Dealing with an uneven surface often requires additional labor and materials to ensure proper installation, which can increase the overall cost of the project.
- Potential drainage issues: Uneven ground may affect the patio’s drainage, leading to water pooling in certain areas. Proper grading and installation of a drainage system may be necessary.
- Increased risk of settling: Uneven ground may result in uneven settling of the bricks over time, potentially causing tripping hazards or an uneven surface.
- Limited furniture placement: Uneven ground may restrict the placement of furniture or require additional measures such as leveling or building raised platforms for seating areas.
- Professional expertise may be needed: Dealing with uneven ground may require specialized knowledge and skills. Hiring a professional contractor or landscaper with experience in working with uneven terrain can ensure a successful and long-lasting patio installation.
It’s important to note that the specific pros and cons can vary based on the severity of the unevenness and the techniques used to address it. Consulting with a professional contractor or landscaper can help you assess the specific requirements of your project and make informed decisions.


Six steps tutorial below will show you how to make a brick patio on uneven ground.
It also works if you are using stone or concrete pavers materials.
1. Build the pathways on uneven ground by using terraces or steps on the steeper area
Lay individual brick first on the lowest part of the slope. To build pathways on uneven ground using terraces or steps, you can follow these steps:

- Planning: Start by assessing the area and determining the desired route for your pathway. Consider the slope of the ground and identify the steeper sections where steps or terraces will be needed.
- Materials and Tools: Gather the necessary materials and tools for the project. For terraces or steps, you’ll need bricks, pavers, or stone blocks for the construction, gravel or crushed stone for the base, sand for leveling, a shovel, a rake, a level, a rubber mallet, and a compactor.
- Excavation: Begin by excavating the area where the pathway will be located. Remove any grass, plants, or debris from the surface. Dig down to a depth of around 6 to 8 inches to create space for the base materials.
- Base Preparation: Fill the excavated area with a layer of crushed stone or gravel. Spread it evenly and compact it using a compactor to create a stable and level base. Aim for a depth of around 4 to 6 inches, depending on your specific project requirements.
- Leveling: Use a long board or a screed to level the crushed stone or gravel base. Move the board back and forth while resting it on the surrounding edges of the excavation to create a smooth and even surface.
- Adding Sand: Spread a layer of sand over the compacted base. The sand helps in the leveling process and provides a stable surface for laying the bricks or pavers. Use a rake to distribute the sand evenly.
- Installing Terraces or Steps: For terraces, stack bricks or stone blocks in a staggered pattern to create a retaining wall that levels out the slope. Ensure that each layer is level by using a level tool. Backfill the terrace with soil and compact it. For steps, place bricks or pavers horizontally in the desired pattern to create each step. Ensure that the steps are level and securely positioned.
- Finishing: Once the terraces or steps are installed, fill in the gaps between them with sand. Use a broom to sweep the sand into the gaps, ensuring that they are completely filled. Lightly wet the area to settle the sand, and add more sand if necessary.
- Maintenance: Regularly maintain the pathways by sweeping away debris and keeping the surfaces clean. Check for any loose bricks or pavers and replace or reposition them as needed.
Remember to take safety precautions while working on uneven ground and wear appropriate protective gear. Additionally, it’s advisable to consult local building codes or seek professional advice if you have any specific regulations or concerns in your area.
2. Evaluate the terrain to find if there are any humps or solid elements.
Assess valleys and dips that might be formed due to the natural drainage pressure or leaked drainage pipe. There must be none of the water below the brick patio so it won’t flow under or over the surface.
To evaluate the terrain and identify any humps or solid elements, you can follow these steps:

- Visual Inspection: Begin by visually surveying the terrain. Walk around the area where you plan to build your pathway and look for any noticeable humps, bumps, or solid objects that may affect the construction. Take note of any irregularities or obstacles you come across.
- Use a Leveling Tool: A leveling tool, such as a long spirit level or a laser level, can help you assess the evenness of the ground. Place the leveling tool on different areas of the terrain and observe the bubble or laser line. If the bubble consistently rests off-center or the laser line is not level, it indicates an uneven surface.
- Physical Assessment: Walk the entire pathway route and pay attention to how the ground feels beneath your feet. Notice if there are any areas that feel higher or lower than the surrounding terrain. Step on the potential humps or solid elements to confirm their presence and determine their size and stability.
- Observe Water Flow: Water tends to flow downhill, so observe how water moves across the terrain during rainfall or after watering the area. This can reveal any low points or depressions where water collects, as well as potential humps where water tends to flow around.
- Use Surveying Equipment: For more accurate and detailed assessments, you may consider using professional surveying equipment. A land surveyor can help you measure the elevation and identify any significant variations in the terrain.
- Consider Previous Knowledge: If you have any prior knowledge or information about the terrain, such as past experiences or historical data, take them into account. For instance, if the area is known to have rocky patches or underground utilities, be aware of their potential impact on the pathway construction.
By combining these evaluation methods, you can gain a comprehensive understanding of the terrain, identify any humps or solid elements, and make informed decisions about how to proceed with building your pathway. If you encounter significant challenges or uncertainties, it’s advisable to consult professionals, such as landscape architects or engineers, for further guidance.
read also: How to Build Steps with Pavers – Simple (DIY) Tutorial
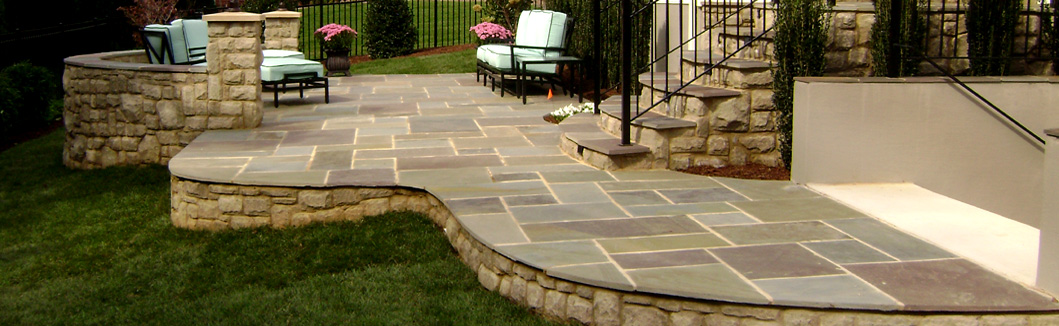
3. Set retaining walls on either or both sides and have the patio level with the theme.
If the slope is moderate, you may only use one side wall, but for a steeper slope, it is best to use on two sides.
Setting retaining walls on either or both sides of a patio can create a level surface and help integrate the patio with the surrounding theme. Here’s an explanation of how to achieve this:
- Planning: Start by determining the desired location and size of your patio. Consider the overall theme or aesthetic you want to achieve and how it will blend with the surrounding landscape. Measure the area and create a design plan that includes the placement of the retaining walls.
- Materials and Tools: Gather the necessary materials for the retaining walls, such as bricks, concrete blocks, or stone blocks. You will also need gravel or crushed stone for the base, concrete mix, a shovel, a level, a rubber mallet, a compactor, and a trowel.
- Excavation: Begin by excavating the area where the patio will be located. Remove any vegetation, rocks, or debris. Dig down to the desired depth, typically around 6 to 8 inches plus the thickness of the materials used for the base and the retaining walls.
- Base Preparation: Fill the excavated area with a layer of crushed stone or gravel. Spread it evenly and compact it using a compactor to create a stable base for the patio.
- Installing Retaining Walls: Start by laying the first row of the retaining wall materials at the edges of the excavated area. Ensure that the first row is level by using a level tool. Use a rubber mallet to tap the blocks into place firmly. Continue adding additional rows until you reach the desired height for the retaining walls.
- Leveling: Use a level to check the overall levelness of the patio area within the retaining walls. Adjust the base as needed by adding or removing crushed stone or gravel. Ensure that the patio surface is even and sloped slightly away from any nearby structures for proper drainage.
- Setting the Patio Surface: Once the base is level, it’s time to set the patio surface material. Depending on your chosen theme, you can use bricks, pavers, stone tiles, or any other material that aligns with the desired aesthetic. Lay the materials according to the manufacturer’s instructions, ensuring they are level and firmly set. Use a rubber mallet to tap them into place if necessary.
- Finishing Touches: Fill the gaps between the patio surface materials with sand or fine gravel. Use a broom to sweep the sand or gravel into the gaps, ensuring they are completely filled. Lightly wet the area to settle the sand or gravel and add more if needed. Trim the edges of the patio with a saw or chisel for a neat finish.
- Maintenance: Regularly maintain the patio by sweeping away debris and keeping the surface clean. Check the retaining walls for any signs of damage or movement and make repairs as necessary.
By setting retaining walls on either or both sides of the patio, you create a level and visually pleasing space that complements the surrounding theme. Ensure proper construction techniques and materials are used to ensure the durability and stability of the retaining walls and patio surface.
4. dig the area with a shovel or excavator
The next step on how to make a brick patio on uneven ground is to dig the area with a shovel or excavator. Then lay gravel starting from larger ones to the smaller course.
When preparing an area for construction or landscaping, you can dig the area using either a shovel or an excavator, depending on the size and complexity of the project. Here’s an explanation of how to dig the area using these tools:
Using a Shovel:

- Assess the Area: Begin by assessing the area you need to dig. Determine the dimensions and depth required for your project. Identify any potential obstacles or utilities that may be present underground, such as pipes, cables, or tree roots.
- Safety Precautions: Before starting any digging, prioritize safety. Wear appropriate personal protective equipment, including gloves, safety glasses, and sturdy footwear. Also, ensure you know the location of utility lines by contacting your local utility companies or using underground utility locating services if necessary.
- Prepare the Tools: Get a sturdy shovel suitable for your specific digging needs. A square-point shovel is commonly used for general digging, while a round-point shovel is more effective for digging holes or trenches. Make sure the shovel is in good condition with a sharp blade.
- Start Digging: Begin by inserting the shovel blade vertically into the ground and using your foot to press down on the shovel to penetrate the soil. Lift the soil out of the hole and move it to a designated area, such as a wheelbarrow or a pile nearby.
- Repeat the Process: Continue digging in a systematic manner, moving along the designated area. Use the shovel to break up any compacted soil or remove roots or rocks that may obstruct your progress. As you dig deeper, consider creating stepped sections in the excavation to ensure stability and safety.
Using an Excavator:

- Assess the Area: Assess the area and determine if using an excavator is appropriate and necessary for the scope of your project. Excavators are typically used for larger projects, extensive earthmoving, or when dealing with challenging soil conditions.
- Rent or Hire an Excavator: If you don’t own an excavator, you can rent one from a local equipment rental company. Alternatively, hire an experienced operator who can operate the equipment safely and efficiently.
- Safety Precautions: Prioritize safety before operating the excavator. Ensure that the operator is trained and familiar with the machine. Follow all safety guidelines and precautions provided by the manufacturer and wear the appropriate safety gear.
- Clear the Area: Before operating the excavator, remove any obstacles or obstructions from the area to prevent accidents or damage. Ensure there is ample space for the excavator to maneuver safely.
- Start Excavating: With the operator inside the excavator, begin by positioning the machine at the desired starting point. Use the controls to operate the excavator’s bucket or other attachments, digging into the ground and scooping out the soil. Move the excavated material to a designated area, such as a dump truck or a separate pile.
- Proceed with Caution: Take care when excavating around existing structures, utilities, or trees to avoid damage. Use the excavator’s controls to maintain control and precision while digging. Regularly check the depth and alignment to ensure you achieve the desired results.
- Backfill and Grading: Once the necessary excavation is completed, you can proceed with backfilling or grading the area as required for your specific project. Use the excavator or other tools, such as rakes or shovels, to distribute the soil and achieve the desired contours.
Always exercise caution and follow local regulations when digging, especially if there are underground utilities or other potential hazards. If you encounter challenges or if the project is complex, it’s advisable to consult professionals or hire an experienced excavator operator for assistance.
5. Lay the bricks on your desired pattern.
Consider the seams and gaps between them. To lay bricks in your desired pattern, follow these steps:
- Prepare the Surface: Ensure that the surface where you’ll be laying the bricks is clean, level, and properly prepared. This may involve excavating the area, adding a base layer of compacted gravel or sand, and ensuring proper drainage if needed.
- Gather the Materials: Collect all the necessary materials, including bricks, mortar mix, a trowel, a level, a jointing tool (such as a pointing trowel or a striking iron), a rubber mallet, and a broom.
- Plan the Pattern: Decide on the brick pattern you want to use, such as running bond, herringbone, basket weave, or any other desired design. Plan out the pattern by measuring and marking the layout on the surface using chalk or string lines.
- Mix the Mortar: Follow the manufacturer’s instructions to mix the mortar. Typically, you’ll need to combine mortar mix with water until you achieve a workable consistency. Use a trowel or a mixing paddle attached to a drill for this task.
- Apply Mortar Bed: Start by applying a layer of mortar to the prepared surface. Use the trowel to spread a thin, even layer of mortar in the area where you’ll lay the first row of bricks. Make sure the mortar bed is slightly thicker than the height of the bricks.
- Lay the First Bricks: Place the first brick at the starting point of the pattern. Gently press it into the mortar bed, ensuring it’s level and aligned according to your design. Use a rubber mallet to tap the brick lightly into place if needed.
- Continue Laying Bricks: Lay the subsequent bricks adjacent to each other, leaving a small gap between them for mortar (typically 1/4 to 3/8 inch). Apply mortar to the end of each brick before placing it beside the previous one. Use a level to ensure the bricks are even and aligned both horizontally and vertically.
- Cut Bricks When Necessary: If you need to fit bricks into smaller spaces or around corners, use a brick chisel and hammer or a wet saw to cut them to the desired size and shape.
- Check and Adjust: Regularly check the levelness, alignment, and pattern of the bricks as you work. Make adjustments as needed, tapping bricks gently with a rubber mallet or adding or removing mortar to achieve the desired results.
- Clean and Finish: Once all the bricks are laid, use a jointing tool to finish the mortar joints, ensuring they are uniform and neat. Brush away any excess mortar or debris from the surface using a broom. Allow the mortar to dry and cure according to the manufacturer’s instructions.
Remember to work in manageable sections, so the mortar doesn’t dry out before you lay the bricks. Take your time, work carefully, and periodically step back to assess your progress and ensure the pattern remains consistent.
read more: How to Lay Paving Slabs on a Slope – Easy Step by Step
6. Complete the project by filling the gaps with sand.
To complete your brick project, filling the gaps between the bricks with sand is an essential step. Here’s how you can do it:
- Gather Materials: Collect fine-grain sand suitable for filling the gaps between the bricks. You may use polymeric sand, which contains additives that help it harden when activated with water, or regular sand mixed with dry cement for better stability.
- Clean the Surface: Before filling the gaps, ensure the surface is free of debris, dust, or excess mortar. Use a brush or broom to sweep the surface, making sure to remove any loose materials that may interfere with the sand application.
- Apply Sand: Pour the sand onto the brick surface, focusing on the gaps between the bricks. Use a broom or brush to distribute the sand evenly, ensuring it fills the gaps completely. Work in small sections at a time to ensure the sand is applied uniformly.
- Settle the Sand: Gently tap the brick surface with a rubber mallet or use a vibrating plate compactor to help settle the sand into the gaps. This process ensures the sand fills the spaces tightly and provides stability and support to the bricks.
- Add More Sand and Repeat: After settling, you may notice that the sand settles further into the gaps. Add more sand as needed and repeat the settling process until the gaps are uniformly filled.
- Remove Excess Sand: Once the gaps are adequately filled, use a broom to sweep off any excess sand from the surface of the bricks. Make sure the surface is clean and free of any loose sand.
- Wet the Surface: To activate the hardening process for polymeric sand, or to aid in the curing of sand mixed with dry cement, lightly mist the surface with water. Be cautious not to oversaturate the sand, as it may cause it to become muddy or wash out.
- Allow for Curing: Depending on the type of sand used, allow the sand to cure and set according to the manufacturer’s instructions. This typically involves avoiding foot traffic or disturbing the sand until it has fully hardened.
- Finishing Touches: Once the sand has fully cured, you can do a final inspection of the brick surface. Check for any gaps that may have settled or areas that require additional sand filling. Add more sand if needed and repeat the settling process.
By filling the gaps between the bricks with sand, you enhance the stability of the bricks, reduce weed growth, and provide a finished and polished appearance to your project. Regular maintenance, including periodic reapplication of sand, may be necessary over time to ensure the integrity and longevity of the filled gaps.
Technically, it is not really difficult to build a brick patio on yourself, as long as you are willing to devote energy and time to it. You have to haul tons of brick, stone, gravel, and sands in order to get this project done.
Read More :
- 3 Best Natural Stone Patio To Use As Outdoor Design Inspirations
- Various Ornaments to Make Your Terrace More Attractive
- How to Lay Patio Pavers on Dirt : Easy DIY Project at Home [Details]
By following guide on how to make a brick patio on the uneven ground above, it may take you two or three weeks to finish with a small group of helpers and even longer if you do it yourself.
How to make a brick patio on uneven ground Other Method
- Plan and Design: Start by planning the layout and design of your brick patio. Consider the size, shape, and placement of the patio in relation to your outdoor space. Take into account any existing landscape features or obstacles that may affect the patio’s construction.
- Prepare the Area: Clear the area where the patio will be installed, removing any vegetation, rocks, or debris. If the ground is significantly uneven, you may need to excavate and level the area using a shovel or a rented grading tool.
- Create a Base: A stable base is crucial for a durable and long-lasting brick patio. Spread a layer of crushed stone or gravel evenly over the excavated area to create a firm base. Compact the base using a tamper or plate compactor to ensure stability.
- Install Edging: Install plastic or metal edging around the perimeter of the patio area to contain the bricks and prevent them from shifting or spreading. Secure the edging firmly into the ground using stakes or spikes.
- Lay a Sand Bed: Spread a layer of sand over the compacted base. Use a screed (a long, straight board) to level the sand, ensuring it is even and uniform across the entire patio area. The thickness of the sand bed will depend on the height variation of the uneven ground.
- Begin Brick Installation: Start laying the bricks according to your desired pattern, starting from one corner and working your way outward. Use a rubber mallet or a dead blow hammer to tap each brick into place, making sure they are level and properly aligned. Place a slight gap between the bricks for jointing material.
- Adjust for Uneven Areas: When encountering uneven areas, use additional sand or crushed stone to adjust the height and create a level surface. Tap the bricks into place, checking for levelness as you go.
- Fill Joints: Once all the bricks are in place, sweep fine sand or polymeric sand into the joints between the bricks. This helps lock them in position and prevents weed growth.
- Compact and Finish: Use a plate compactor to lightly compact the bricks, settling them into the sand bed. Sweep off any excess sand and clean the surface of the patio.
- Maintain and Seal: Regularly maintain your brick patio by sweeping off debris and periodically reapplying jointing sand as needed. Consider sealing the bricks to enhance their longevity and protect them from stains and weathering.
Remember, if the ground is excessively uneven, it may be necessary to consult with a professional or consider grading and leveling the area before proceeding with the brick patio installation.
read also: 25 Best Living Room with Fireplace Ideas – InspiraBuilding.com
Inspiration and Design – More Photos For How To Make a Brick Patio On Uneven Ground Ideas
Free to share photos – Public domain


More How to Make a Brick Patio on Uneven Ground for All Country Including USA, Europe, Australia, Asia, Middle East – Best Home Furniture.
Alabama, Alaska, Arizona, Arkansas, California Colorado Connecticut Delaware District of Columbia Florida Georgia Hawaii Idaho Illinois Indiana Iowa Kansas Kentucky Louisiana Maine Maryland Massachusetts Michigan Minnesota Mississippi Missouri Montana Nebraska Nevada New Hampshire New Jersey New Mexico New York North Carolina North Dakota Ohio Oklahoma Oregon Pennsylvania Rhode Island South Carolina South Dakota Tennessee Texas Utah Vermont Virginia Washington West Virginia Wisconsin Wyoming
British, Italia, Rusia, South Africa, Dubai, Saudi Arabia, Australia, Indonesia, Philippines, Malaysia, Singapura, Tokyo, Japan, Taiwan, South Korea.
How to Make a Brick Patio on Uneven Ground – Arab Saudi – Riyadh Armenia – Yerevan Azerbaijan – Baku Bahrain – Manama Georgia – Tbilisi Iran – Tehran Irak – Baghdad Kuwait – Kuwait City Lebanon – Beirut Oman – Muscat Palestina – Ramallah Qatar – Doha Siprus – Nicosia Suriah – Damaskus Turki – Ankara Uni Emirat Arab – Abu Dhabi Yaman – Sanaa Yordania – Amman – China – Beijing Hong Kong – Hong Kong Jepang – Tokyo Taiwan – Taipei Makau – Makau Mongolia – Ulan Bator Korea Selatan – Seoul Korea Utara – Pyongyang – Afghanistan – Kabul Bangladesh – Dhaka Bhutan – Thimphu India – New Delhi Maladewa – Male Nepal – Kathmandu Pakistan – Islamabad Sri Lanka – Kolombo – Brunei Darussalam – Bandar Seri Begawan Kamboja – Phnom Penh Indonesia – Jakarta Laos – Vientiane Malaysia – Kuala Lumpur Myanmar – Naypyidaw Filipina – Manila Singapura – Singapura Thailand – Bangkok Timor Leste – Dili Vietnam – Hanoi – Algeria – Algiers Libya – Tripoli Mesir – Kairo Maroko – Rabat Sudan – Khartoum Sudan Selatan – Juba Tunisia – Tunis – Guatemala – Guatemala City El Salvador – San Salvador Honduras – Belize Nikaragua – Managua Kosta Rika – San Jose Panama – Panama City – Argentina – Buenos Aires Brasil – Brasilia Bolivia – Lapaz Chili – Santiago Colombia – Bogota Ecuador – Quito Guyana Perancis- Cayenne Guyana – Georgetown Paraguay – Asuncion Peru – Lima Suriname – Paramaribo Uruguay – Montevideo Venezuela – Caracas – Denmark – Kopenhagen Islandia – Reykjavik Norwegia – Oslo Finlandia – Helsinki Swedia – Stockholm – Yunani – Athena Italia – Roma Spanyol – Madrid Portugal – Lisabon Malta – Valletta Vatikan – Vatikan San Marino – San Marino Andorra – Andorra la Vella – Austria – Wina Belgia – Brussels Belanda – Amsterdam Inggris – London Irlandia – Dublin Monako – Monako Perancis – Paris Luxemburg – Luxemburg Liechtenstein – Vaduz Jerman – Berlin Swiss – Bern
